
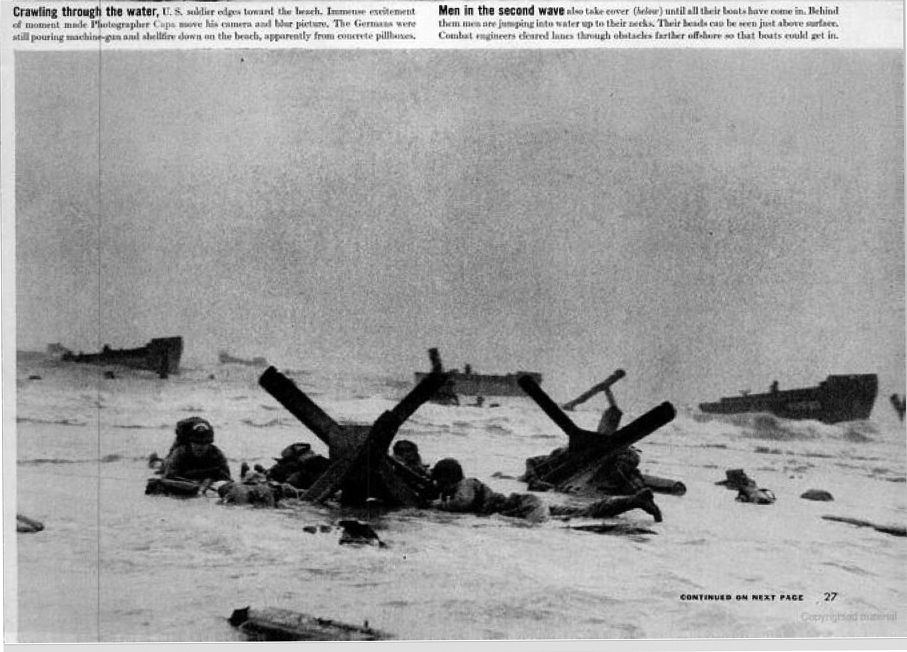
Robert Capa, detail from “Beachheads of Normandy,” LIFE magazine, June 19, 1944, p. 27.
[Editor’s Note: Amateur military historian Charles Herrick’s earlier posts in this series corrected 70 years’ worth of miscaptioning of one of Robert Capa’s ten D-Day photographs from Omaha Beach. Via close scrutiny of Capa’s negative 35, Herrick — an ex-combat soldier and avid amateur military historian — demonstrated that what LIFE in its June 19, 1944 issue and most subsequent publications had always described as terrified assault troops sheltering themselves from blistering enemy fire on Easy Red were in fact courageous combat engineers hard at work demolishing Nazi obstacles so that landing craft could approach the beach and offload their troops and materiel.
In this new article, Herrick reviews the military documents, beach topography, and relevant photographs (by Capa and others) to establish, insofar as possible, the exact location and time of Capa’s arrival on Omaha Beach. Part 1 appears below; click here for Part 2. — A. D. C.]
•
Luck of the Draw:
The Seam in the Defenses
by Charles Herrick
One of the enduring mysteries of the Capa D-Day legend involves his landing site. Much of the confusion, it must be noted, is due to Capa himself. His assertion in Slightly Out Of Focus that he landed in the first wave with Co. E, 16th RCT greatly confused things. Almost all of Co. E mis-landed on Fox Green, which led many to believe Capa landed there as well.
We know, however, that Capa did not land with Co. E or anyone else in the first wave. He was on the wrong attack transport for that. His attack transport was scheduled to land troops on Easy Red beginning much later, starting with Wave 10 at H+70 minutes (0740 hours).
[Note: Troops arriving at Omaha Beach came in on landing craft that were grouped together in “waves.” In popular histories of D-Day, the term “wave” frequently gets used very loosely, which has led to considerable confusion. Strictly speaking, using its own official terminology, the 16th Regimental Combat Team (RCT) scheduled 22 consecutive waves to land on the Easy Red sector of Omaha Beach at specified intervals — ranging between 5 and 17 minutes — over the course of the first three hours and forty minutes of D-Day. I will use that terminology here and henceforth. — C. H.]
Even if Capa did land on Easy Red, that sector was more than a mile long, and enemy resistance varied greatly along its length. Determining his exact landing site, therefore, is important if we want to place his landing experience in context.
The key to this question lies in a set of photos taken from an LCI (Landing Craft, Infantry) later on D-Day. One picture (Figure 1) shows a segment of the skyline identical to that shown in four of Capa’s exposures (Figure 2). The camera angles are almost identical, allowing for different distances from the shore between the two photos. (Click to enlarge.)
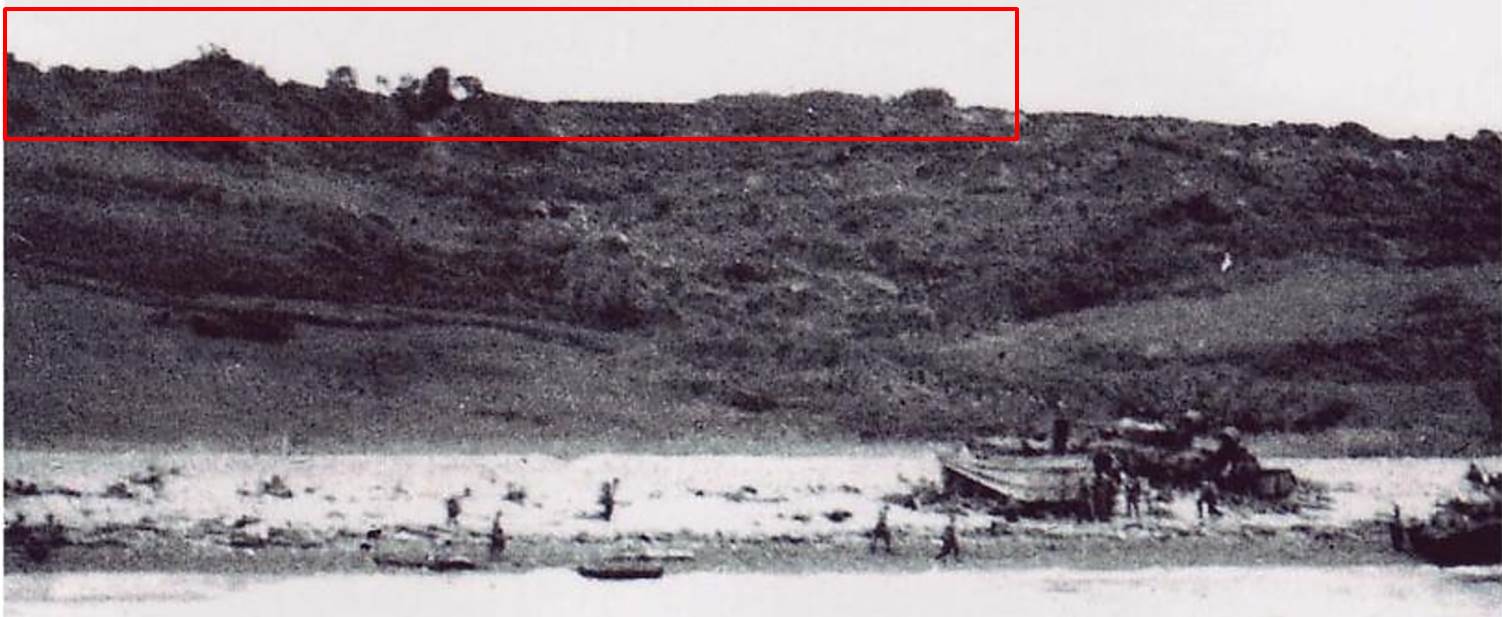
Figure 1. The LCI’s view of the bluffs before it beached. Area outlined in red is the skyline visible in Figure 2.
•

Figure 2. Capa’s negative 32 (detail). Note the configuration of the skyline within the red outline.
The next task, then, is to pinpoint that spot on Easy Red. Fortunately, a photo taken when the same LCI was beached included an easily recognizable feature on the flats behind the shingle embankment: a destroyed set of buildings termed the “Roman Ruins” in some contemporary reports. (Click to enlarge.)
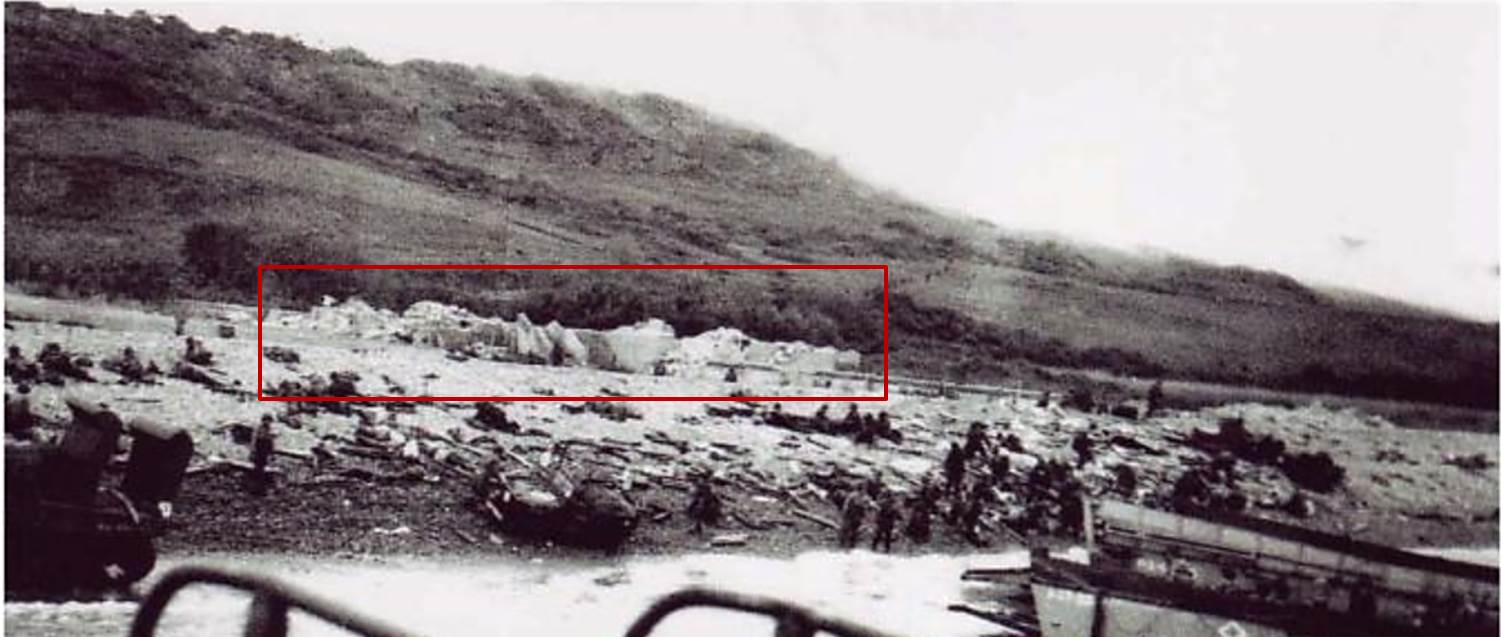
Figure 3. The “Roman Ruins” on Easy Red. This photo taken from the same LCI as Fig. 1, with the camera oriented about 45 degrees to the right (west) relative to the view in Figure 2.
On an otherwise featureless stretch of beach, these ruins provided an easy reference point, and therefore are visible in several photos shot before, during and after the landings. (Click to enlarge.)
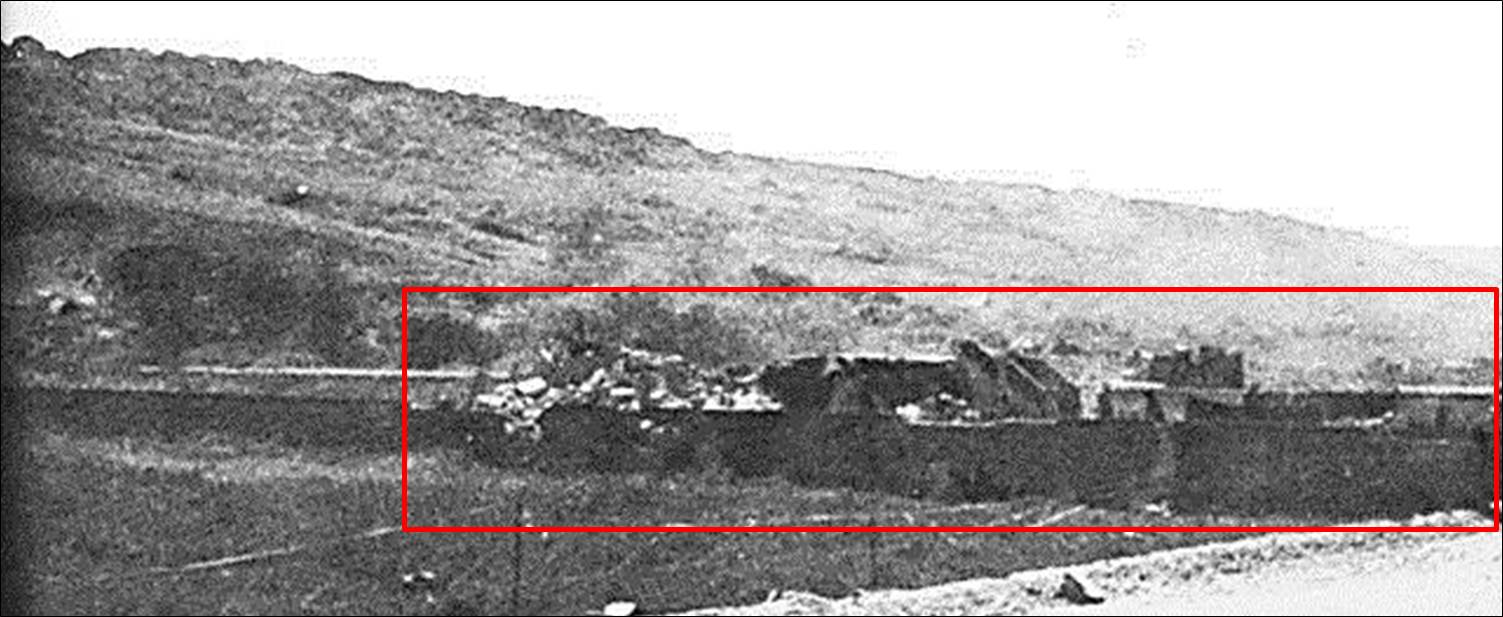
Figure 4. “The Ruins on Easy Red,” from the U.S. Army’s “Omaha Beachhead (6 June – 13 June 1944).”
This definitively places Capa’s landing just a few yards east of the Roman ruins on Easy Red, which means we can pinpoint his landing site relative to the key military terrain features. And that site happened to be a very important location in the story of D-Day. Roughly midway between the Wn 64 strongpoint (protecting the E-1 draw) and the Wn 62 strongpoint (E-3 draw), the area of the ruins was only lightly covered by enemy defenses. [Note: WN is the abbreviation for widerstandsnest, which translates as “pocket of resistance.” The German military used this term to designate its reinforced-concrete pillboxes for artillery and small-arms weapons and other defensive strongpoints along the Normandy coast. — Ed.]
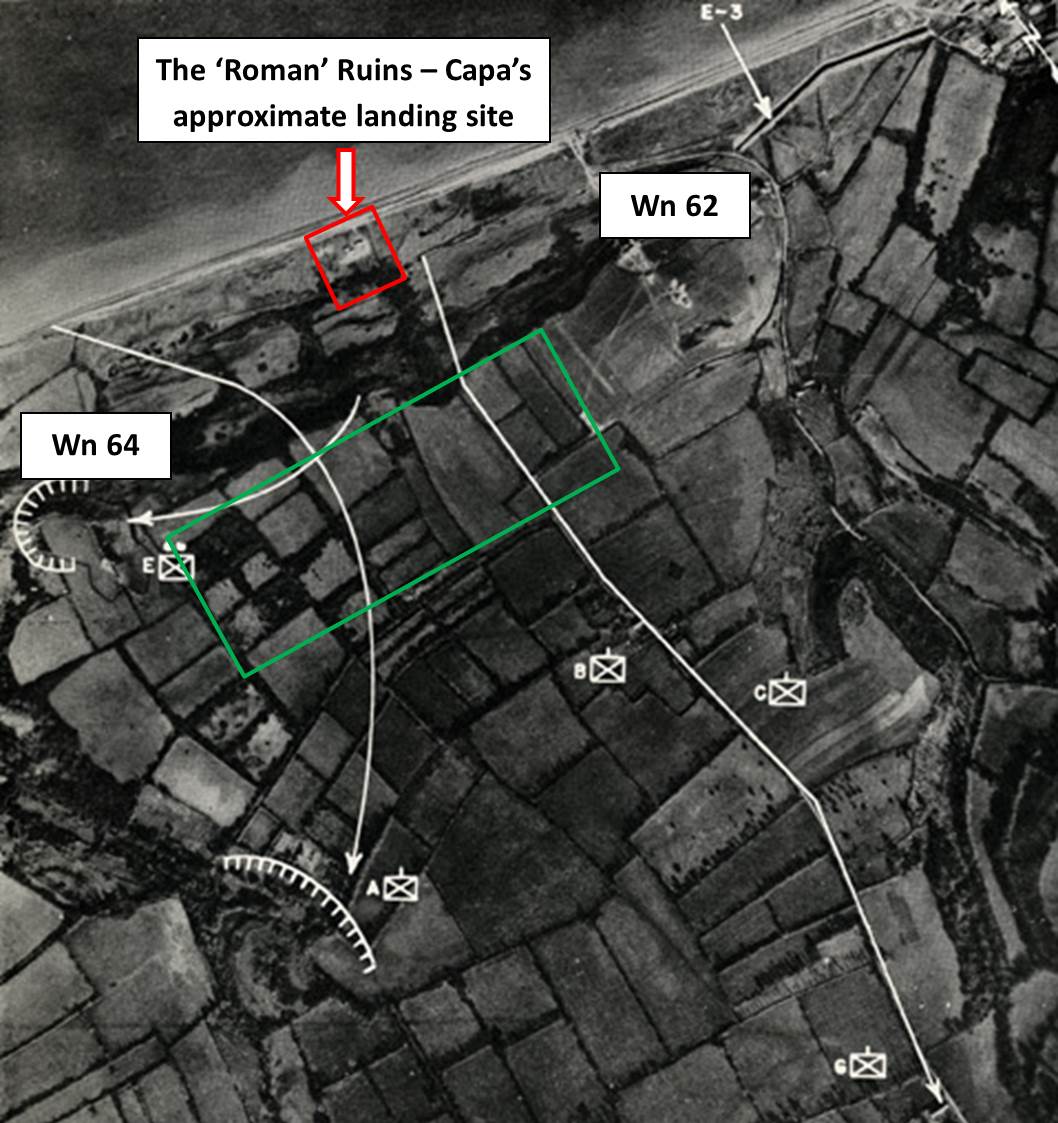
Figure 5. The Ruins on Easy Red in relation to Wn 62 and Wn 64. The routes of Lt. Spalding’s boat section and Cos. G, C and B past the ruins and up the bluffs are shown. The green box is the current location of the U.S. Military Cemetery in Normandy.
The ruins were on the edge of effective small arms range from those two strongpoints, but those weapons primarily had to concentrate against troops landing directly in front of the exits, not on the area of the ruins. Scattered, lightly held entrenchments at the top of the bluffs between the strongpoints tried to cover this gap. Intermittent enemy artillery fire covered the area of the ruins, but it primarily targeted larger landing craft, and was not capable of stopping an infantry advance. The area of the ruins was in fact a seam in the enemy defenses, one that would prove fatal to the Germans and a godsend to the Americans. (Click to enlarge.)
“Light” is a relative term when describing fire, especially if you are on the receiving end. Nevertheless, volume of fire is not in itself a measure of effectiveness. The most meaningful measure is whether fire prevents the attacker from succeeding. By that criterion, fire covering the area of the ruins was a failure, as the experiences of units landing there demonstrated.
•
The first Americans landing before the “Roman ruins” were in two duplex drive (DD) tanks of Wave 1.[i] They were two of only five DD tanks scheduled for Fox Green and Easy Red that made it to the beach. Because of the light enemy fire there, these tanks survived and proceeded to engage enemy defenses.
Gap Assault Team 10 (Wave 4) arrived 8 minutes early, before even the standard tanks (Wave 2) and assault infantry (Wave 3). It met little enemy fire … initially. Only after they had blown the first group of obstacles did they receive machine-gun and artillery fire. Despite taking casualties, Team 10 cleared three gaps. The fact that this one team cleared as many gaps as the other 15 gap assault teams combined proves that enemy fire, its volume notwithstanding, was relatively ineffective in this sector.
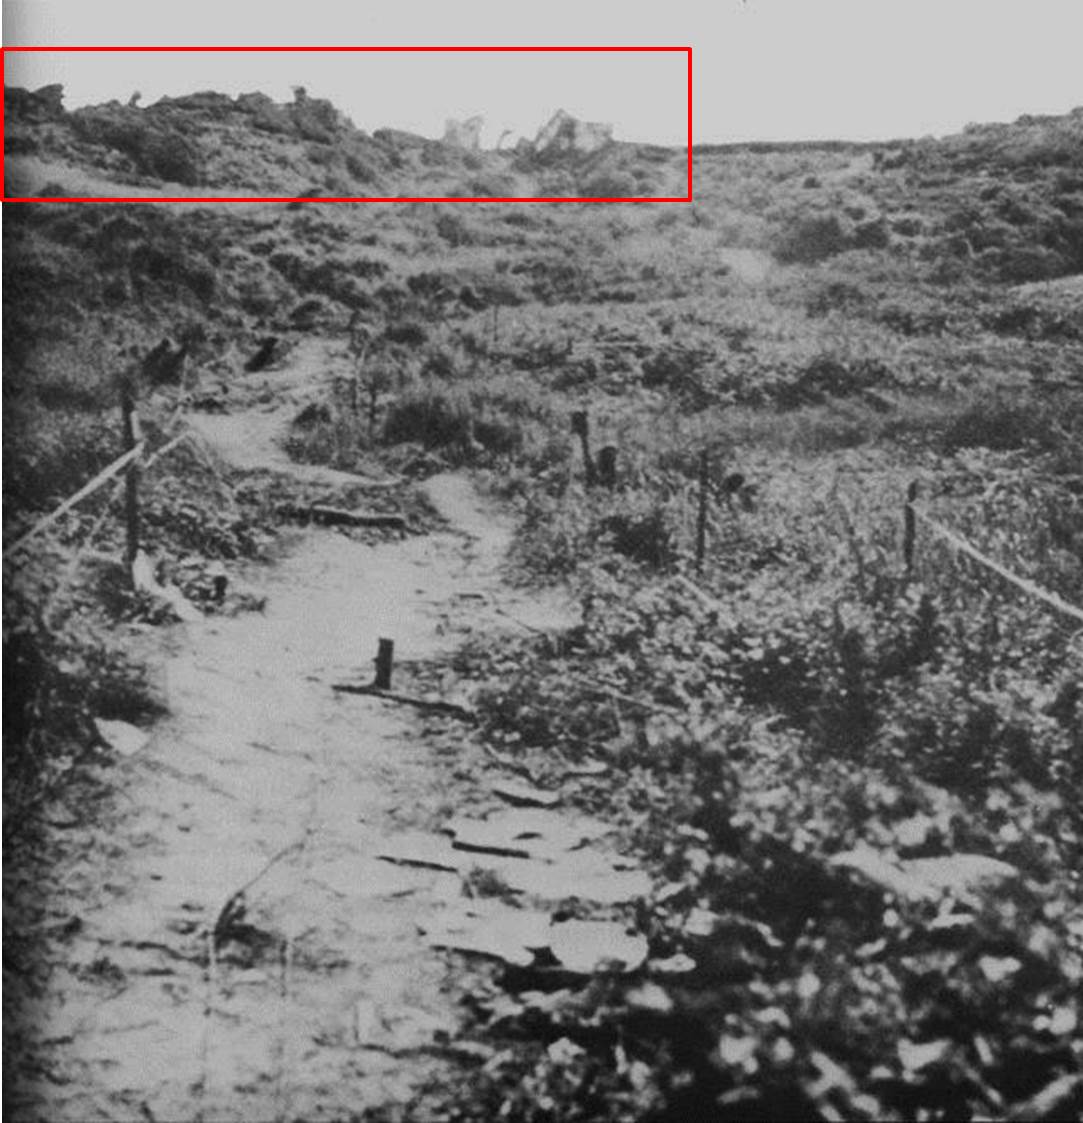
Figure 6. The path up the bluffs behind the “Roman ruins.” The skyline in red is the same as seen in Figures 1 and 2.
By then LCT-2425[ii] (Landing Craft, Tank) had landed two standard tanks and one bulldozer tank which survived to go into action. Though one tank eventually had its main gun knocked out and another became stuck in the shingle (these tanks are visible on the right of Figure 1), all five tanks — and perhaps one or two more — remained in action near the ruins during the first critical three hours of the invasion.
Next, a lone boat section from Co. E, 16th RCT, landed in front of the ruins. While the rest of the company was being savaged under the defenses of Wn 62 — it suffered 120 casualties that day — Lt. John M. Spalding’s boat section waded through the surf, crossed about 250 yards of tidal flats, blasted a gap through the German barbed wire, and proceeded along the side of the Roman Ruins to the base of the bluff, losing just three men in the process. (Click to enlarge.)
Fire here increased at 0700 hours when Co. G landed at the same spot in front of the ruins. They reported 49 casualties that day (out of 227 men),[iii] the bulk of which were suffered between landing and the base of the bluffs; many, however, resulted from a capsized LCVP, not enemy fire. The unit retained cohesion and organization and by 0710 hours followed in Lt. Spalding’s footsteps, picking up fragments of two lost boat sections from the sister 116th RCT in the process. These units soon joined and moved against the lightly held defenses at the crest of the bluffs.
Company G’s machine guns and mortars, left in overwatch positions at the shingle, were ready to support by 0730 hours. These weapons couldn’t eliminate the defenders at Wn 62 strongpoint, but they succeeded in at least partially suppressing their fire, making follow-on landings at the ruins and movement inland easier. While direct enemy fire continued, it was never again as effective on this stretch of beach.
Between 0740 and 0800 hours the regiment’s reserve, the 2nd Battalion, landed. The experiences of its companies illustrated the relative safety of the area of the ruins. After some minor adventures, Cos. B and C followed the path past the ruins to the top of the bluffs, losing just 7 killed in action (KIA) and 21 wounded in action (WIA) between them for all of D-Day (out of a combined strength of about 440 men). Co. A, on the other hand, landed in front of Wn 64 and conducted a frontal assault, losing 60 men — 45 of them while crossing the anti-tank ditch.
(Part 1 I 2)
Notes:
[i] Two DD tanks succeeded in swimming in and three were landed directly on the beach from their LCT (according to the 741st Tank Battalion AAR). All were from Co. B; none of the Co. C DD tanks made it to the beach. Martin K. A. Morgan stated in The Americans on D-Day: A Photographic History of the Normandy Invasion that these two DD tanks were the two that had swum in.
[ii] Both Gap Assault Team 10 and the two tanks and one tank dozer crossed the Channel on LCT 2425 (identified as LCT 10 by the ship serial numbers in the landing tables). At 0230 hours, the Engineers transferred to an LCM about two miles off shore and rode this craft into the beach. As the LCT 2425 approached the beach, its two tanks fired continuously over the ramp to provide suppression. Navy Lt. Karnowski noted the LCT came in at about 0640 hours.
[iii] Initial casualty reports for D-Day through noon of D-+1 showed 60 casualties, including 26 MIA presumed to be stragglers. Corrected casualty reports complied in the following days showed only 49 casualties for those initial 30 hours.
Picture credits:
- Figures 1 & 3: The Americans on D-Day: A Photographic History of the Normandy Invasion, by Martin K. A. Morgan (Zenith Press, 2014).
- Figure 2: Robert Capa, D-Day frame 4 / negative 32 (detail).
- Figures 4, 5, 6: Omaha Beachhead (6 June – 13 June 1944), American Forces in Action Series (U.S. War Dept., Historical Division, 1994).
Text copyright © 2015 by Charles Herrick. Illustrations © Charles Herrick 2015 as noted. All rights reserved.
•
(For an index of links to all posts in this series, click here.)
•
 Charles Herrick joined the U.S. Army in 1970 and graduated from the U.S. Military Academy at West Point in 1974. Commissioned in the Infantry, he earned the Ranger tab and Master Parachutist’s wings. He served in a variety of positions from company grade officer to the Pentagon. He earned the Combat Infantryman’s badge while assigned as the Operations Officer of the 193rd Infantry Brigade in Panama in 1989, and later graduated from the U.S. Army War College.
Since retiring from the Army in 1996, Herrick has continued to work on defense issues as a contractor in East Asia, Latin America, the Balkans, Africa and Central Asia. He holds an MBA from the University of California at Los Angeles. He lives in California with his wife, where he pursues his passion for military history. To contact Charles Herrick, click here.

Leave a Reply